How to Upgrade Existing Glass Into Digital Displays Without Replacing the Window
Retrofitting existing windows with transparent LED film has become one of the most efficient ways for some plublic places and architects to transform static glass surfaces into dynamic, digital storytelling platforms. With the rapid development of transparent LED film technologies, adding visual content to a window no longer requires replacing the glass or installing bulky LED cabinets. Instead, ultra-thin, transparent LED films can be applied directly onto existing windows—turning them into vibrant digital canvases that are nearly invisible when not in use.
This comprehensive guide provides a complete, professional blueprint for how to retrofit any existing window with transparent LED film. Whether you are a system integrator, AV installer, signage consultant, retail designer, or building contractor, this article walks through every step of the process—from the initial site survey to cleaning, adhesion, lamination, cable routing, power and data planning, on-site testing, and long-term maintenance.
We will cover:
- What transparent LED film is and why it’s ideal for retrofitting
- Step-by-step site survey methods
- Choosing the right type of adhesive and lamination method
- Glass preparation procedures
- Power, data, cable routing, and controller placement
- Installation workflow and troubleshooting
- Long-term care and performance optimization
Understanding Transparent LED Film Technology
Before retrofitting any window, it’s essential to understand how transparent LED film works and what makes it uniquely suited for installation on existing glass surfaces.
What is transparent LED film?
Transparent LED film is an ultra-thin, flexible display medium composed of:
- A PET or TPU transparent substrate
- Embedded micro-LEDs (RGB SMD or COB)
- Transparent conductive pathways (ITO, graphene, silver nanowire)
- Ultra-thin flexible PCBs
- Optional optically clear adhesives
Film thickness ranges from 0.3–1.0 mm, depending on pixel pitch and wiring density. Once applied to glass, the LEDs appear to float on the surface without any visible structure—creating a transparent LED film screen that blends seamlessly into the environment.
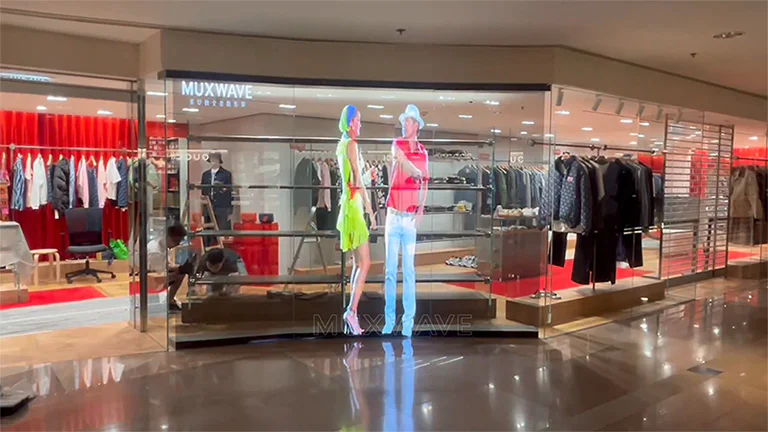
Transparency levels
Typical transparency values:
| 70–85% (high-density pixel pitch such as P6–P8) | 85–95% (medium pixel pitch P10–P15) | 95%+ (ultra transparent film LED screens, P20–P30) |
More transparency means fewer visible wires—but also fewer LEDs per square meter.
Pixel pitch options
Pixel pitch determines resolution and viewer distance. Common options:
- P6–P8: Retail windows with close foot traffic
- P10–P12: Street-facing storefronts
- P20–P30: Large atriums, airports, or skywalks
Matching pitch to viewing distance is essential for maximizing visual clarity while maintaining transparency.
Why transparent LED film is ideal for retrofits
Unlike traditional LED cabinets:
- No drilling into frames
- No replacement of glass
- Minimal weight (<400 g/m²)
- Bendable and conformable
- Easy to install and remove
- Allows natural light and visibility
- Meets fire safety and building-code requirements more easily
This enables architects and AV integrators to upgrade any window—from retail storefronts to lobbies partitions, without actual structural disruption.
Conducting a Professional On-Site Survey (Most Critical Step)
A proper site survey ensures that installation is done safely, cleanly, and efficiently. A transparent film LED screen can only perform well if environmental and structural conditions are understood in advance.
Measure and document all window dimensions
Accurate measurement avoids costly reorders and misalignment.
Here is a simple checklist for reference:
- Exact width & height of each glass panel
- Visible glass area (not frame-to-frame)
- Any mullions, stickers, handles, or obstructions
- Window curvature or unusual angles
- Space around the window for cable routing
- Interior and exterior viewing directions
Identify glass material and surface coating
Glass type affects installation method, adhesion, and thermal behavior.
| Glass Type | Suitability | 참고 |
|---|---|---|
| Tempered glass | 우수 | Most retail and commercial windows |
| Laminated glass | Very good | Adhesive works well if PVB is stable |
| Low-E coated glass | Conditional | May reduce adhesion; test required |
| Double-glazed | Good | Cable routing planning needed |
| Curved glass | Good | Use high-flexibility LED film |
The specific installation method should follow the instructions provided in the original manufacturer’s product manual.
Environmental factors
Record environmental parameters:
- Temperature (optimal 10–35°C)
- Humidity (below 60%)
- Direct exposure to sunlight
- Heating/AC vents near the glass
- Rain or condensation risks
High humidity causes adhesive failure. High heat can reduce transparency and LED efficiency.
Access to power and data
Transparent LED films require integrated power and data distribution systems.
Survey must include:
- Nearest AC power outlets
- Possible locations for power supplies
- Controller installation points
- Maximum cable run length
- Pathways for cable concealment
Make sure no visible cables appear on the glass surface.
Structural access & installation feasibility
Check for:
- Ladder or lift accessibility
- Ability to work during business hours (if retail)
- Dust or debris sources
- Safety zones inside/outside
Preparing the Glass Before Installation
The window must be prepared meticulously. Transparent LED film can only bond to glass that is spotless, dry, and free of oils or loose debris.
Surface preparation procedure
Step 1 — Scrape glass: Remove any residue (stickers, glue, tape, silicone).
Step 2 — Degrease: Apply industrial degreaser to eliminate oil.
Step 3 — Alcohol wipe: Clean entire surface using isopropyl alcohol.
Step 4 — Dust removal: Use microfiber cloths and dust rollers.
Step 5 — Final inspection: Look for scratches, pits, and embedded dust.
A transparent LED film screen is unforgiving—any flaw underneath becomes visible.
Adhesion & Lamination Methods for Transparent LED Film
Different solutions require different bonding strategies. Choose the right one depending on window curvature, surface quality, and expected lifespan.
Optically Clear Adhesive (OCA) – Most common method
대부분 LED transparent film display screens come with factory-applied OCA.
Advantages:
- Highest optical clarity
- Strong bond
- Long lifespan
- Fast installation
Installation steps:
- Peel 5–10 cm of protective liner.
- Align film starting from top edge.
- Apply downward pressure evenly.
- Remove air bubbles with soft squeegee.
- Do not stretch or pull the film.
Wet lamination method
Some films allow a water-based installation fluid.
혜택:
- Better bubble removal
- More forgiving alignment
However:
- Requires longer curing time
- Not suitable for Low-E glass
Edge-bonding reinforcement
Silicone or acrylic edge bonding is used when:
- Film sheet height is >2 m
- Installation area is windy
- Surface is slightly uneven
- Reducing risk of peeling
Mechanical clamping (no adhesive)
Ideal for:
- Temporary retail campaigns
- Museums requiring no residue
- Sensitive historical structures
Disadvantages:
- Slightly reduced flatness
- Limited lifetime
Cable Routing, Data Planning & Power Structure
Even though transparent LED film is thin, it requires precise electrical integration.
Understanding cable types
A typical transparent LED film installation includes:
- Flexible flat data cables (FPC/FFC)
- Low-voltage DC power cables
- Ethernet or proprietary control lines
- Modular connectors between sheets
5.2 Power consumption considerations
Power consumption varies by pixel pitch and brightness:
- Retail Brightness Mode (1500–2500 nits): 200–400 W/m²
- Outdoor Glass Behind Window (3000–5000 nits): 300–800 W/m²
- High Transparency Film (P20–P30): 100–250 W/m²
Plan power supplies to stay within 10 m cable distance to prevent voltage drop.
Cable exit strategies
Cable routing must be invisible.
Method A — Use gaps between glass and frame (ideal): No drilling required.
Method B — Through the mullion: Drill small concealed holes if permitted.
Method C — Downward routing into cabinetry: Common in showrooms and storefront windows.
Method D — Ceiling/soffit routing: Perfect for museums and atriums.
Controller placement
Controllers are typically installed:
- Behind decorative panels
- Inside cabinetry
- Above drop ceilings
- Behind display walls
Key requirements:
- Adequate ventilation
- Dry environment
- Easy access for reboot/updates
- Proper grounding
Full Installation Workflow: From Start to Finish
- Below is the complete professional-grade retrofit sequence.
- Step 1 — Site survey & documentation: Record measurements, power locations, and routing paths.
- Step 2 — Window preparation: Deep clean the glass.
- Step 3 — Unroll and inspect film: Check for bent circuits, scratches, or LED damage.
- Step 4 — Position film: Align top corners; use tape for temporary holding.
- Step 5 — Apply adhesive: Peel liner slowly; apply pressure evenly.
- Step 6 — Connect film modules: Join FPC/FFC connectors.
- Step 7 — Route cables: Hide cables inside frames or mullions.
- Step 8 — Install power supplies: Verify correct voltage output.
- Step 9 — Install controller & test: Load sample content to confirm,Pixel orientation | Color accuracy | Brightness uniformity |Transparency consistency
- Step 10 — Final calibration: Adjust brightness based on ambient light.
- Step 11 — Client handover & training: Provide a maintenance and operational guide.
Troubleshooting: What Can Go Wrong and How to Fix It
Air bubbles
Cause: Poor cleaning
솔루션: Re-squeegee or remove and reapply.
Peeling edges
Cause: Improper adhesion or humidity
솔루션: Add edge-bonding.
Dead pixel lines
Cause: Broken film circuit or bent cable
솔루션: Replace affected sheet.
Flickering content
Cause: Data interference
솔루션: Shorten cable length, replace controller.
Reduced transparency
Cause: Dust trapped under film
솔루션: Remove film; clean glass; reapply.
Maintenance and Long-Term Care
Transparent LED films are highly reliable, but require ongoing care.
Cleaning guidelines
- Use alcohol or mild cleaners
- Never use abrasive scrapers
- Clean with microfiber cloths only
Power supply care
- Keep power supplies dust-free
- Ensure airflow
- Inspect annually
Content optimization
Use content with:
- High contrast
- Minimal white areas (reduces power draw)
- Motion-friendly graphics
Lifecycle management
Transparent LED films last:
- 50,000–100,000 hours
- 5–7 years in high-sunlight environments
- 7–10 years indoors
결론
Retrofitting existing windows with transparent LED film is one of the most impactful, cost-effective innovations in modern digital display integration. It allows businesses and architects to add engaging digital content without altering the building structure or replacing glass. A transparent LED film screen, LED transparent film screen, or transparent film LED screen delivers a nearly invisible, lightweight, energy-efficient upgrade that enhances both branding and architectural aesthetics.
By following a rigorous workflow—conducting an accurate site survey, selecting the right adhesion method, preparing glass properly, routing cables cleanly, and planning power/data intelligently—installers can achieve world-class results that look seamless and perform reliably for years.
Transparent LED film is no longer just a niche signage solution. It is rapidly becoming a mainstream architectural display technology, enabling creative installations in retail, museums, airports, offices, and commercial façades worldwide.
